Sunday, March 13, 2011

PSOVM and Active Data Guard : enabling ADG

To go further, it is assumed you have set a Physical Standby Database on Peoplesoft OVM as shown in my previous blog entry : PSOVM and Activate Data Guard : Physical Standby Database
As explained in previous post, we created a Physical Standby Database, it should be relatively straightforward to enable the Active Data Guard. That will allow end users to query (in read only mode) the standby database whilst the redo are applying onto that standby database, feature known to be real-time query.
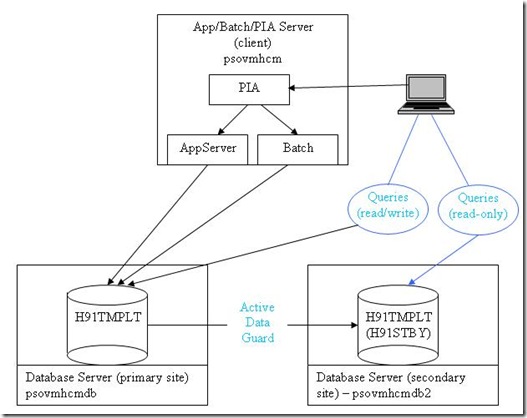
At the end of this stage, the architecture will be as follow (in blue the change compared to the previous post) :
PS_ACTIVEDG_035
1. dg_broker_start init parameter
Set the dg_broker_start to true on primary database and on secondary database
SQL> alter system set dg_broker_start=true;
System altered.
2. Create the dataguard configuration
On the primary site, start the Data Guard Manager client command line for the configuration settings :
[oracle@psovmhcmdb dbs]$ dgmgrl
DGMGRL for Linux: Version 11.1.0.7.0 - 64bit Production
Copyright (c) 2000, 2005, Oracle. All rights reserved.
Welcome to DGMGRL, type "help" for information.
DGMGRL> connect sys/oracle@H91TMPLT (connection to the primary database)
Connected.
DGMGRL> create configuration psovmdgmgrl
> as primary database is H91TMPLT
> connect identifier is H91TMPLT;
Configuration "psovmdgmgrl" created with primary database "h91tmplt"
DGMGRL> add database H91STBY
> as connect identifier is H91STBY
> maintained as physical;
Database "h91stby" added
DGMGRL>
DGMGRL> enable configuration
Enabled.
DGMGRL> show configuration

Configuration
  Name:                psovmdgmgrl
  Enabled:             YES
  Protection Mode:     MaxPerformance
  Databases:
    h91tmplt - Primary database
    h91stby  - Physical standby database

Fast-Start Failover: DISABLED
Current status for "psovmdgmgrl":
SUCCESS

DGMGRL>
3. Turn off the redo apply (dgmgrl)
In order to have an active data guard, we should stop the replication first (run dgmgrl on primary site) :
DGMGRL> edit database h91stby set state=apply-off;
Succeeded.
DGMGRL>
4. Read-only mode
Now, we can open the secondary database in read-only mode (on the further startups, that mode will be the default one):
SQL> alter database open read only;
Database altered.
5. Turn on the redo apply (dgmgrl)
Now, we can turn the redo apply on again (run dgmgrl on primary site)
DGMGRL> edit database h91stby set state=apply-on;
Succeeded.
DGMGRL>
6. Test
We will see if the replication is working whilst the standby database is open in read-only mode and “query-able” as SYSADM user.
6.1 On the secondary database
SQL> select instance_name,host_name from v$instance
SQL> /
INSTANCE_NAME    HOST_NAME
---------------- ----------------------------------------------------------------
H91TMPLT         psovmhcmdb2

SQL> conn sysadm/SYSADM
Connected.
SQL> select count(*) from psoprdefn;

  COUNT(*)
----------
       155
SQL> select oprid from psoprdefn where trunc(LASTPSWDCHANGE)=trunc(sysdate);

no rows selected
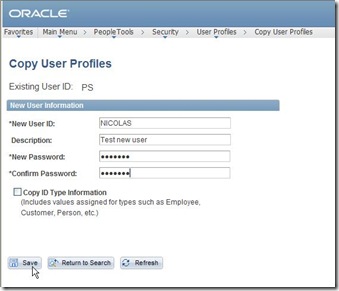
6.2 Within the front-end application, we’ll duplicate PS user as following
PS_ACTIVEDG_001
PS_ACTIVEDG_002 PS_ACTIVEDG_003

6.3 And now, on the secondary database, re-run the previous query, it should return one more row
SQL> select oprid from psoprdefn where trunc(LASTPSWDCHANGE)=trunc(sysdate);
OPRID
---------------------------------------------------
NICOLAS

SQL> select count(*) from psoprdefn;
  COUNT(*)
----------
       156

SQL>
=> the new created user is coming to the secondary database, and we can check it directly from PSOPRDEFN (that would not be possible without Active Data Guard).
7. For the record, show the dgmgrl status (configuration and databases)
[oracle@psovmhcmdb ~]$ dgmgrl
DGMGRL for Linux: Version 11.1.0.7.0 - 64bit Production
Copyright (c) 2000, 2005, Oracle. All rights reserved.
Welcome to DGMGRL, type "help" for information.
DGMGRL> connect sys/oracle@H91TMPLT
Connected.
DGMGRL> show configuration

Configuration
  Name:                psovmdgmgrl
  Enabled:             YES
  Protection Mode:     MaxPerformance
  Databases:
    h91tmplt - Primary database
    h91stby  - Physical standby database

Fast-Start Failover: DISABLED
Current status for "psovmdgmgrl":
SUCCESS

DGMGRL> show database h91stby
Database
  Name:            h91stby
  Role:            PHYSICAL STANDBY
  Enabled:         YES
  Intended State:  APPLY-ON
  Instance(s):
    H91TMPLT

Current status for "h91stby":
SUCCESS

DGMGRL> show database h91tmplt
Database
  Name:            h91tmplt
  Role:            PRIMARY
  Enabled:         YES
  Intended State:  TRANSPORT-ON
  Instance(s):
    H91TMPLT

Current status for "h91tmplt":
SUCCESS

DGMGRL>
Now we can talk, query a database without loading the primary database while the redo continue to be applied. That's really helpful, especially for users who run a lot of reports through a tier query tool. Once more, PSOVM allow us to test it easily before implementing it in real live.
But it can be not enough. An other great feature coming with the latest PSOVM and Peopletools 8.51 is the StandbyDBName configuration possiblity on Batch and AppServer. That's obviously the next step. To be continued.

Read my next articles :

Saturday, March 12, 2011

PSOVM and Active Data Guard : Physical Standby Database

Peoplesoft Oracle VM (PSOVM) templates are really nice.  That allows customers to test Peoplesoft Application in an easy way. Easy and quick deployment.
Moreover, assuming you have space enough to host the VMs and a spare server to host the Oracle VM Server, the cost is nearly zero. 
=> That's the perfect tool for the business team, the latest PSOVM HCM9.1 is coming within the Features Pack 1 (Dec-2010). All the new functionalities are included and there's also the optional installation of the 30-days trial Cobol license. 
=> That's the perfect tool for the development team, the latest PSOVM HCM9.1 is coming within the latest Peopletools version (8.51.02 - the patch 07 is already released, but except bugs fixes, it should not make big differences), and it’s also coming within the binaries for AppDesigner and DataMover. Developpers can now test everything they want without much configuration and installation efforts. 
=> That's (almost) the perfect tool for the Peoplesoft DBA, in addition of the latest Peopletools version, the latest PSOVM HCM9.1 is coming within one of the latest Oracle Database version. Unfortunately, the Oracle database is not the last version, it is 11gR1 (11.1.0.7). Some new features of 11gR2 would be great to have, to name only two : segment creation deferrable (do not occupied space when table is empty) and few on Active Data Guard (ASH, STANDBY_MAX_DATA_DELAY).
But 11gR1 is good enough to test the Active Data Guard that Peoplesoft customers are looking for a while. A really nice feature to get a reporting database whilst the redolog continue to be applied (it’s known as real-time query). And that will be the subject here.
So, the exercise will be to have a database that end users will be able to query without over-loading the primary database, but having the latest data. First of all, create a Physical Standby Database.
Since primary and secondary databases will come from the same templates, we are sure about the same OS (and version) (OEL5.2) and the same database version (11.1.0.7).
1. The configuration
1.1
Install a working PSOVM environment as shown here
=> 1 database server, the primary site (psovmhcmdb), hosting the primary database (db name H91TMPLT, unique name H91TMPLT).
=> 1 App/Batch/PIA server
1.2 Install an additional database server, the secondary site (psovmhcmdb2) hosting the secondary database (db name H91TMPLT, unique name H91STBY). This one is deployed as a normal db server (see step 1.1), to make it simpler, the database name is named as the primary one, H91TMPLT. The PSOVM deployment scripts will create all the necessary folders and files.
1.3 Here below a schema of the target configuration we are currently looking for at this stage. 

  PS_ACTIVEDG_034Note 1 : the DB_NAME and DB_UNIQUE_NAME  of the database on primary site is H91TMPLT
Note 2 : the DB_NAME of the database on secondary site is H91TMPLT, DB_UNIQUE_NAME is H91STBY
2. First settings on primary db (primary site – psovmhcmdb)
It is assumed the primary database server has been successfully deployed and database name is H91TMPLT.
2.1 Archive log mode
The delivered database in PSOVM Database Server is not in archivelog mode, it has to be changed :
[oracle@psovmhcmdb .ssh]$ export ORACLE_SID=H91TMPLT
[oracle@psovmhcmdb .ssh]$ sqlplus / as sysdba
SQL*Plus: Release 11.1.0.7.0 - Production on Thu Mar 10 04:49:35 2011
Copyright (c) 1982, 2008, Oracle.  All rights reserved.
Connected to an idle instance.
SQL> startup mount
ORACLE instance started.
Total System Global Area  288104448 bytes
Fixed Size                  2159032 bytes
Variable Size              96472648 bytes
Database Buffers          184549376 bytes
Redo Buffers                4923392 bytes
Database mounted.
SQL> alter database archivelog;

Database altered.
SQL> alter database open;
2.2 spfile
The delivered database in PSOVM Database Server does not use a spfile but a pfile, let’s make it
SQL> show parameter spfile
NAME         TYPE         VALUE
------------ ------------ ------------------------------
spfile       string      
SQL> create spfile from pfile;

File created.
SQL> startup force
ORACLE instance started.

Total System Global Area  288104448 bytes
Fixed Size                  2159032 bytes
Variable Size              96472648 bytes
Database Buffers          184549376 bytes
Redo Buffers                4923392 bytes
Database mounted.
Database opened.
SQL> show parameter spfile

NAME         TYPE         VALUE
------------ ------------ ------------------------------
spfile       string       /u01/app/oracle/product/11.1.0/db_1/dbs/spfileH91TMPLT.ora

2.3 Create the directory of archive log files
We will create a dedicated folder for the archive log files onto the primary database server, first, have a look where it should go.
[oracle@psovmhcmdb oradata]$ df -k
Filesystem           1K-blocks      Used Available Use% Mounted on
/dev/xvda2             3177204   1037312   2139892  33% /
/dev/xvda1               31077      8277     21196  29% /boot
tmpfs                  2097152         0   2097152   0% /dev/shm
/dev/xvdb1             9851308   4480692   4870196  48% /u01
/dev/xvdc1            41286796  20908248  18281264  54% /opt/oracle/psft/ptdb <—18Gb free seems good for us
[root@psovmhcmdb ~]# cd /opt/oracle/psft/ptdb
[root@psovmhcmdb ptdb]# mkdir -p arch/H91TMPLT
[root@psovmhcmdb ptdb]# chown -R oracle:dba arch
[root@psovmhcmdb ptdb]# su - oracle
[oracle@psovmhcmdb ~]$ cd /u01/app/oracle/oradata
[oracle@psovmhcmdb oradata]$ ln -s /opt/oracle/psft/ptdb/arch/H91TMPLT H91TMPLT_arch
[oracle@psovmhcmdb oradata]$ ls -lrt
total 0
lrwxrwxrwx 1 oracle oinstall 38 Jan 23 06:18 H91TMPLT -> /opt/oracle/psft/ptdb/oradata/H91TMPLT
lrwxrwxrwx 1 oracle oinstall 35 Mar 10 05:00 H91TMPLT_arch -> /opt/oracle/psft/ptdb/arch/H91TMPLT
......

Let’s make the database using it
SQL> shutdown immediate
Database closed.
Database dismounted.
ORACLE instance shut down.
SQL> startup mount
ORACLE instance started.

Total System Global Area  288104448 bytes
Fixed Size                  2159032 bytes
Variable Size              96472648 bytes
Database Buffers          184549376 bytes
Redo Buffers                4923392 bytes
Database mounted.
SQL> alter system set log_archive_dest='/u01/app/oracle/oradata/H91TMPLT_arch';

System altered.
SQL> alter database open;
Database altered.
SQL> archive log list
Database log mode              Archive Mode
Automatic archival             Enabled
Archive destination            /u01/app/oracle/oradata/H91TMPLT_arch
Oldest online log sequence     8
Next log sequence to archive   10
Current log sequence           10
SQL>

2.4 Force logging
The primary database must be turned on to force logging :
SQL> alter database force logging;
Database altered.
SQL>

3. Remove db file on secondary site - psovmhcmdb2
It is assumed the secondary database server has been successfully deployed and database name is H91TMPLT. When the secondary database server has been deployed, it created the database, we don’t need that one, all the datafiles must be removed.
3.1 Check for the datafiles
[oracle@psovmhcmdb2 ~]$ export ORACLE_SID=H91TMPLT
[oracle@psovmhcmdb2 ~]$ sqlplus / as sysdba
SQL*Plus: Release 11.1.0.7.0 - Production on Thu Mar 10 05:10:50 2011
Copyright (c) 1982, 2008, Oracle.  All rights reserved.
Connected to:
Oracle Database 11g Enterprise Edition Release 11.1.0.7.0 - 64bit Production
With the Partitioning, OLAP, Data Mining and Real Application Testing options

SQL> select distinct substr(name,1,instr(name,'/',-1)) from v$datafile
  2  union
  3  select distinct substr(name,1,instr(name,'/',-1)) from v$tempfile
  4  union
  5  select distinct substr(member,1,instr(member,'/',-1)) from v$logfile;

SUBSTR(NAME,1,INSTR(NAME,'/',-1))
--------------------------------------------------------------------------------
/u01/app/oracle/oradata/H91TMPLT/

3.2 Shutdown the secondary database
SQL> shutdown immediate
Database closed.
Database dismounted.
ORACLE instance shut down.
SQL> quit
Disconnected from Oracle Database 11g Enterprise Edition Release 11.1.0.7.0 - 64bit Production
With the Partitioning, OLAP, Data Mining and Real Application Testing options
[oracle@psovmhcmdb2 ~]$
3.3 Remove the db file
[oracle@psovmhcmdb2 ~]$ rm -f /u01/app/oracle/oradata/H91TMPLT/*
4. Copy the db file of primary to secondary site - psovmhcmdb2
4.1
Check the dbf of primary database and create the script to copy all the datafiles
SQL> set lines 200 pages 0 head off feed off trims on
SQL> spool scp.sh
SQL> select 'gzip -c '||name||' | ssh psovmhcmdb2 "gunzip -c > '||name||'"' from v$datafile;
...
gzip -c /u01/app/oracle/oradata/H91TMPLT/waapp.dbf | ssh psovmhcmdb2 "gunzip -c > /u01/app/oracle/oradata/H91TMPLT/waapp.dbf"
SQL> spool off
 4.2 Shutdown the primary db
SQL> shutdown immediate
Database closed.
Database dismounted.
ORACLE instance shut down.
SQL> quit
Disconnected from Oracle Database 11g Enterprise Edition Release 11.1.0.7.0 - 64bit Production
With the Partitioning, OLAP, Data Mining and Real Application Testing options
[oracle@psovmhcmdb ~]$
4.3 Copy the dbf from primary to secondary site (execute the script create earlier at step 4.1). Good enough, the name of the two databases on both sites are the same, consequently the path directories are the same, not change required. (note: the script will work if a ssh-keygen has been configured between the servers)
[oracle@psovmhcmdb ~]$ chmod +x scp.sh
[oracle@psovmhcmdb ~]$ ./scp.sh
5. Open the primary db on the primary site - psovmhcmdb
5.1
create pfile from spfile
[oracle@psovmhcmdb ~]$ sqlplus / as sysdba
SQL*Plus: Release 11.1.0.7.0 - Production on Thu Mar 10 06:43:33 2011
Copyright (c) 1982, 2008, Oracle.  All rights reserved.
Connected to an idle instance.
SQL> create pfile from spfile;
File created.
SQL> quit
Disconnected
[oracle@psovmhcmdb ~]$

5.2 Set the init parameters required for the physical standby settings (in bold the changes made)
[oracle@psovmhcmdb ~]$ cd $ORACLE_HOME/dbs
[oracle@psovmhcmdb dbs]$ vi initH91TMPLT.ora
H91TMPLT.__db_cache_size=184549376
H91TMPLT.__java_pool_size=4194304
H91TMPLT.__large_pool_size=4194304
H91TMPLT.__oracle_base='/u01/app/oracle'#ORACLE_BASE set from environment
H91TMPLT.__pga_aggregate_target=96468992
H91TMPLT.__sga_target=289406976
H91TMPLT.__shared_io_pool_size=0
H91TMPLT.__shared_pool_size=88080384
H91TMPLT.__streams_pool_size=0
*._unnest_subquery=false
*.compatible='11.1.0.7.0'
*.control_files='/u01/app/oracle/oradata/H91TMPLT/control01.ctl'
*.db_block_size=8192
*.db_domain='us.oracle.com'
*.db_file_multiblock_read_count=16
*.DB_FILES=256
*.DB_NAME='H91TMPLT'
#*.dispatchers='(PROTOCOL=TCP) (SERVICE=XDB)'
*.job_queue_processes=10
#*.log_archive_dest='/u01/app/oracle/oradata/H91TMPLT_arch'
*.NLS_LENGTH_SEMANTICS='CHAR'
*.OPEN_CURSORS=1000
*.pga_aggregate_target=95420416
*.processes=150
*.remote_login_passwordfile='NONE'
*.sga_target=287309824
*.undo_management='AUTO'
*.undo_tablespace='PSUNDOTS'
#####
log_archive_dest_1='LOCATION=/u01/app/oracle/oradata/H91TMPLT_arch VALID_FOR=(ALL_LOGFILES,ALL_ROLES) DB_UNIQUE_NAME=H91TMPLT'
log_archive_dest_2='SERVICE=H91STBY VALID_FOR=(ONLINE_LOGFILES,PRIMARY_ROLE) DB_UNIQUE_NAME=H91STBY'
LOG_ARCHIVE_DEST_STATE_1=ENABLE
LOG_ARCHIVE_DEST_STATE_2=ENABLE
DB_UNIQUE_NAME=H91TMPLT
LOG_ARCHIVE_CONFIG='DG_CONFIG=(H91TMPLT,H91STBY)'
standby_file_management=auto
5.3 recreate spfile from pfile
[oracle@psovmhcmdb dbs]$ sqlplus / as sysdba
SQL*Plus: Release 11.1.0.7.0 - Production on Thu Mar 10 06:51:06 2011
Copyright (c) 1982, 2008, Oracle.  All rights reserved.
Connected to an idle instance.
SQL> create spfile from pfile;
File created.
5.4 Open the primary database
SQL> startup mount
ORACLE instance started.
Total System Global Area  288104448 bytes
Fixed Size                  2159032 bytes
Variable Size              96472648 bytes
Database Buffers          184549376 bytes
Redo Buffers                4923392 bytes
Database mounted.
SQL>

5.5 Create standby controlfile and pfile for secondary db
SQL> alter database create standby controlfile as '/tmp/H91STBY.ctl';
Database altered.
SQL> alter database open;
Database altered.
SQL> create pfile='/tmp/initH91STBY.ora' from spfile;
File created.

5.6 Set more parameters on primary database
SQL> alter system set standby_file_management=auto;
System altered.
SQL> alter system set FAL_SERVER=H91STBY;
System altered.
SQL> alter system set FAL_CLIENT=H91TMPLT;
System altered.
SQL>
6. tnsnames.ora
Set the primary and secondary databases in tnsnames.ora on both servers, primary and secondary sites, as following (assuming the servers name have been properly added into /etc/hosts) :
[oracle@psovmhcmdb dbs]$ more $ORACLE_HOME/network/admin/tnsnames.ora
# tnsnames.ora Network Configuration File:
H91TMPLT =
  (DESCRIPTION =
    (ADDRESS_LIST =
      (ADDRESS = (PROTOCOL = TCP)(HOST = psovmhcmdb.phoenix.nga)(PORT = 1521))
    )
    (CONNECT_DATA =
      (SERVICE_NAME = H91TMPLT.us.oracle.com )
      (SID = H91TMPLT )
    )
  )

H91STBY =
  (DESCRIPTION =
    (ADDRESS_LIST =
      (ADDRESS = (PROTOCOL = TCP)(HOST = psovmhcmdb2.phoenix.nga)(PORT = 1521))
    )
    (CONNECT_DATA =
      (SERVICE_NAME = H91TMPLT.us.oracle.com )
      (SID = H91TMPLT )
    )
  )

7. Mount the secondary db on secondary site - psovmhcmdb2
7.1
Copy the standby controlfile and pfile created at step 5.5 onto the secondary site
[oracle@psovmhcmdb2 H91TMPLT]$ pwd
/u01/app/oracle/oradata/H91TMPLT
[oracle@psovmhcmdb2 H91TMPLT]$ scp root@psovmhcmdb:/tmp/H91STBY.ctl control01.ctl
[oracle@psovmhcmdb2 H91TMPLT]$ cd $ORACLE_HOME/dbs
[oracle@psovmhcmdb2 dbs]$ scp root@psovmhcmdb:/tmp/initH91STBY.ora initH91TMPLT.ora
[oracle@psovmhcmdb2 dbs]$
7.2 Set the init parameters of the secondary database
[oracle@psovmhcmdb2 dbs]$ vi initH91TMPLT.ora
H91TMPLT.__db_cache_size=184549376
H91TMPLT.__java_pool_size=4194304
H91TMPLT.__large_pool_size=4194304
H91TMPLT.__oracle_base='/u01/app/oracle'#ORACLE_BASE set from environment
H91TMPLT.__pga_aggregate_target=96468992
H91TMPLT.__sga_target=289406976
H91TMPLT.__shared_io_pool_size=0
H91TMPLT.__shared_pool_size=88080384
H91TMPLT.__streams_pool_size=0
*._unnest_subquery=false
*.compatible='11.1.0.7.0'
*.control_files='/u01/app/oracle/oradata/H91TMPLT/control01.ctl'
*.db_block_size=8192
*.db_domain='us.oracle.com'
*.db_file_multiblock_read_count=16
*.DB_FILES=256
*.DB_NAME='H91TMPLT'
*.DB_UNIQUE_NAME='H91STBY'
*.job_queue_processes=10
*.LOG_ARCHIVE_CONFIG='DG_CONFIG=(H91TMPLT,H91STBY)'
*.log_archive_dest_1='LOCATION=/u01/app/oracle/oradata/H91TMPLT_arch VALID_FOR=(ALL_LOGFILES,ALL_ROLES) DB_UNIQUE_NAME=H91STBY'
*.log_archive_dest_2='SERVICE=H91STBY VALID_FOR=(ONLINE_LOGFILES,PRIMARY_ROLE) DB_UNIQUE_NAME=H91TMPLT'
*.LOG_ARCHIVE_DEST_STATE_1='ENABLE'
*.LOG_ARCHIVE_DEST_STATE_2='ENABLE'
*.NLS_LENGTH_SEMANTICS='CHAR'
*.OPEN_CURSORS=1000
*.pga_aggregate_target=95420416
*.processes=150
*.remote_login_passwordfile='NONE'
*.sga_target=287309824
*.undo_management='AUTO'
*.undo_tablespace='PSUNDOTS'
standby_file_management=auto
fal_server=H91TMPLT
fal_client=H91STBY
7.3 Create the directory of archive log files on the secondary site
[root@psovmhcmdb2 ~]# mkdir -p /opt/oracle/psft/ptdb/arch/H91TMPLT
[root@psovmhcmdb2 ~]# chown -R oracle:dba /opt/oracle/psft/ptdb/arch
[root@psovmhcmdb2 ~]# su - oracle
[oracle@psovmhcmdb2 ~]$ cd /u01/app/oracle/oradata
[oracle@psovmhcmdb2 oradata]$ ln -s /opt/oracle/psft/ptdb/arch/H91TMPLT H91TMPLT_arch
[oracle@psovmhcmdb2 oradata]$ ls -lrt
total 0
lrwxrwxrwx 1 oracle oinstall 38 Mar 10 05:02 H91TMPLT -> /opt/oracle/psft/ptdb/oradata/H91TMPLT
lrwxrwxrwx 1 oracle oinstall 35 Mar 10 07:11 H91TMPLT_arch -> /opt/oracle/psft/ptdb/arch/H91TMPLT
[oracle@psovmhcmdb2 oradata]$
7.4 Mount the secondary database
[oracle@psovmhcmdb2 dbs]$ export ORACLE_SID=H91TMPLT
[oracle@psovmhcmdb2 dbs]$ sqlplus / as sysdba
SQL*Plus: Release 11.1.0.7.0 - Production on Thu Mar 10 07:12:22 2011
Copyright (c) 1982, 2008, Oracle.  All rights reserved.
Connected to an idle instance.
SQL> create spfile from pfile;
File created.
SQL> startup mount
ORACLE instance started.

Total System Global Area  288104448 bytes
Fixed Size                  2159032 bytes
Variable Size              96472648 bytes
Database Buffers          184549376 bytes
Redo Buffers                4923392 bytes
Database mounted.
SQL>

8. Standby redologs
8.1
Create the standby redolog directoy on primary site - psovmhcmdb
[root@psovmhcmdb ptdb]# cd /opt/oracle/psft/ptdb/arch/H91TMPLT/../..
[root@psovmhcmdb ptdb]# mkdir -p redo/H91TMPLT
[root@psovmhcmdb ptdb]# chown -R oracle:dba redo
[root@psovmhcmdb ptdb]# su - oracle
[oracle@psovmhcmdb ~]$ cd /u01/app/oracle/oradata/
[oracle@psovmhcmdb oradata]$ ln -s /opt/oracle/psft/ptdb/redo/H91TMPLT H91TMPLT_redo
[oracle@psovmhcmdb oradata]$ ls -lrt
total 0
lrwxrwxrwx 1 oracle oinstall 38 Jan 23 06:18 H91TMPLT -> /opt/oracle/psft/ptdb/oradata/H91TMPLT
lrwxrwxrwx 1 oracle oinstall 35 Mar 10 05:00 H91TMPLT_arch -> /opt/oracle/psft/ptdb/arch/H91TMPLT
lrwxrwxrwx 1 oracle oinstall 35 Mar 10 07:15 H91TMPLT_redo -> /opt/oracle/psft/ptdb/redo/H91TMPLT
8.2 Create the standby redolog directoy on secondary site - psovmhcmdb2
[root@psovmhcmdb2 ~]# cd /opt/oracle/psft/ptdb/arch/H91TMPLT/../..
[root@psovmhcmdb2 ptdb]# mkdir -p redo/H91TMPLT
[root@psovmhcmdb2 ptdb]# chown -R oracle:dba redo
[root@psovmhcmdb2 ptdb]# su - oracle
[oracle@psovmhcmdb2 ~]$ cd /u01/app/oracle/oradata/
[oracle@psovmhcmdb2 oradata]$ ln -s /opt/oracle/psft/ptdb/redo/H91TMPLT H91TMPLT_redo
[oracle@psovmhcmdb2 oradata]$ ls -lrt
total 0
lrwxrwxrwx 1 oracle oinstall 38 Mar 10 05:02 H91TMPLT -> /opt/oracle/psft/ptdb/oradata/H91TMPLT
lrwxrwxrwx 1 oracle oinstall 35 Mar 10 07:11 H91TMPLT_arch -> /opt/oracle/psft/ptdb/arch/H91TMPLT
lrwxrwxrwx 1 oracle oinstall 35 Mar 10 07:25 H91TMPLT_redo -> /opt/oracle/psft/ptdb/redo/H91TMPLT
8.3 Create the standby redolog on primary db
[oracle@psovmhcmdb oradata]$ export ORACLE_SID=H91TMPLT
[oracle@psovmhcmdb oradata]$ sqlplus / as sysdba
SQL*Plus: Release 11.1.0.7.0 - Production on Thu Mar 10 07:17:07 2011
Copyright (c) 1982, 2008, Oracle.  All rights reserved.
Connected to:
Oracle Database 11g Enterprise Edition Release 11.1.0.7.0 - 64bit Production
With the Partitioning, OLAP, Data Mining and Real Application Testing options

SQL> SELECT GROUP#, BYTES FROM V$LOG;
    GROUP#      BYTES
---------- ----------
         1  104857600
         2  104857600
         3  104857600

SQL> SELECT GROUP#, BYTES FROM V$STANDBY_LOG;
no rows selected
SQL> ALTER DATABASE ADD STANDBY LOGFILE
  2  ('/u01/app/oracle/oradata/H91TMPLT_redo/stb_redo01.log') size 100m,
  3  ('/u01/app/oracle/oradata/H91TMPLT_redo/stb_redo02.log') size 100m,
  3  ('/u01/app/oracle/oradata/H91TMPLT_redo/stb_redo03.log') size 100m
SQL> /

Database altered.
SQL> SELECT GROUP#, BYTES FROM V$STANDBY_LOG;
    GROUP#      BYTES
---------- ----------
         4  104857600
         5  104857600
         6  104857600

SQL>
8.4 Create the standby redolog on secondary db
[oracle@psovmhcmdb2 oradata]$ export ORACLE_SID=H91TMPLT
[oracle@psovmhcmdb2 oradata]$ sqlplus / as sysdba
SQL*Plus: Release 11.1.0.7.0 - Production on Thu Mar 10 07:25:47 2011
Copyright (c) 1982, 2008, Oracle.  All rights reserved.
Connected to:
Oracle Database 11g Enterprise Edition Release 11.1.0.7.0 - 64bit Production
With the Partitioning, OLAP, Data Mining and Real Application Testing options

SQL> ALTER DATABASE ADD STANDBY LOGFILE
  2  '/u01/app/oracle/oradata/H91TMPLT_redo/stb_redo01.log' size 100m,
  3  '/u01/app/oracle/oradata/H91TMPLT_redo/stb_redo02.log' size 100m,
  4* '/u01/app/oracle/oradata/H91TMPLT_redo/stb_redo03.log' size 100m
SQL> /

Database altered.
9. Activate the standby mechanism on secondary db
SQL> ALTER DATABASE RECOVER MANAGED STANDBY DATABASE USING CURRENT LOGFILE DISCONNECT FROM SESSION;
Database altered.
SQL>
10. First test
10.1
Force a switch of logfile on primary db
SQL> ALTER SYSTEM SWITCH LOGFILE;
10.2 Check if archivelog files have been applied on secondary db
SQL> SELECT SEQUENCE#, FIRST_TIME, NEXT_TIME FROM V$ARCHIVED_LOG ORDER BY SEQUENCE#;
no rows selected
10.3 Error issued
The archivelog files have not been applied onto the secondary database, looking into the alert.log file of the primary database, few errors are issued :
2011-03-10 07:44:34.979000 -08:00
Errors in file /u01/app/oracle/diag/rdbms/h91tmplt/H91TMPLT/trace/H91TMPLT_arc2_30195.trc:
ORA-01017: invalid username/password; logon denied
Error 1017 received logging on to the standby
------------------------------------------------------------
Check that the primary and standby are using a password file
and remote_login_passwordfile is set to SHARED or EXCLUSIVE,
and that the SYS password is same in the password files.
      returning error ORA-16191
------------------------------------------------------------
Errors in file /u01/app/oracle/diag/rdbms/h91tmplt/H91TMPLT/trace/H91TMPLT_arc2_30195.trc:
ORA-16191: Primary log shipping client not logged on standby
PING[ARC2]: Heartbeat failed to connect to standby 'H91STBY'. Error is 16191.
=> a password file is required, and by default, the delivered database in PSOVM does not have one.
11. Password files
11.1
Change remote_login_passwordfile to exclusive on secondary db
SQL> alter system set remote_login_passwordfile=exclusive scope=spfile;
System altered.
11.2 Create password file for secondary db, take care, the password file must be named within the DB_UNIQUE_NAME if the database, not within the DB_NAME. So, here on the secondary database DB_UNIQUE_NAME=H91STBY
[oracle@psovmhcmdb2 oradata]$ cd $ORACLE_HOME/dbs
[oracle@psovmhcmdb2 dbs]$ orapwd file=orapwH91STBY password=oracle entries=5
11.3 Bounce the secondary db and activate the standby mechanism
SQL> shutdown immediate
ORA-01109: database not open
Database dismounted.
ORACLE instance shut down.

SQL> startup mount
ORACLE instance started.

Total System Global Area  288104448 bytes
Fixed Size                  2159032 bytes
Variable Size             109055560 bytes
Database Buffers          171966464 bytes
Redo Buffers                4923392 bytes
Database mounted.
SQL> ALTER DATABASE RECOVER MANAGED STANDBY DATABASE USING CURRENT LOGFILE DISCONNECT FROM SESSION;

Database altered.

11.4 Change remote_login_passwordfile to exclusive on primary db
SQL> alter system set remote_login_passwordfile=exclusive scope=spfile;
System altered.
SQL> quit
11.5 Create password file for primary db
[oracle@psovmhcmdb oracle]$ cd $ORACLE_HOME/dbs
[oracle@psovmhcmdb dbs]$ ls
ab_+ASM.dat  hc_H91TMPLT.dat  initdw.ora        init.ora      lk+ASM      lkORCL     orapworcl       spfileH91TMPLT.ora
hc_+ASM.dat  hc_orcl.dat      initH91TMPLT.ora  initorcl.ora  lkH91TMPLT  orapw+ASM  spfile+ASM.ora
[oracle@psovmhcmdb dbs]$ orapwd file=orapwH91TMPLT password=oracle entries=5

11.6 Bounce the primary db
[oracle@psovmhcmdb dbs]$ sqlplus / as sysdba
SQL*Plus: Release 11.1.0.7.0 - Production on Thu Mar 10 07:52:36 2011
Copyright (c) 1982, 2008, Oracle.  All rights reserved.
Connected to:
Oracle Database 11g Enterprise Edition Release 11.1.0.7.0 - 64bit Production
With the Partitioning, OLAP, Data Mining and Real Application Testing options

SQL> shutdown immediate
Database closed.
Database dismounted.
ORACLE instance shut down.
SQL> startup
ORACLE instance started.

Total System Global Area  288104448 bytes
Fixed Size                  2159032 bytes
Variable Size             100666952 bytes
Database Buffers          180355072 bytes
Redo Buffers                4923392 bytes
Database mounted.
Database opened.

12. Second test
12.1
Force a switch of logfile on primary db
SQL> ALTER SYSTEM SWITCH LOGFILE;
System altered.
12.2 Check if archivelog files have been applied on secondary db
SQL> SELECT SEQUENCE#, FIRST_TIME, NEXT_TIME FROM V$ARCHIVED_LOG ORDER BY SEQUENCE#;
SEQUENCE# FIRST_TIME         NEXT_TIME
---------- ------------------ ------------------
        11 10-MAR-11          10-MAR-11
        12 10-MAR-11          10-MAR-11
        13 10-MAR-11          10-MAR-11
        14 10-MAR-11          10-MAR-11
        15 10-MAR-11          10-MAR-11
        16 10-MAR-11          10-MAR-11
        17 10-MAR-11          10-MAR-11
        18 10-MAR-11          10-MAR-11
        19 10-MAR-11          10-MAR-11
        20 10-MAR-11          10-MAR-11
        21 10-MAR-11          10-MAR-11
        22 10-MAR-11          10-MAR-11
        23 10-MAR-11          10-MAR-11
        24 10-MAR-11          10-MAR-11
        25 10-MAR-11          10-MAR-11
        26 10-MAR-11          10-MAR-11
        27 10-MAR-11          10-MAR-11
        28 10-MAR-11          10-MAR-11
        29 10-MAR-11          10-MAR-11
        30 10-MAR-11          10-MAR-11
        31 10-MAR-11          10-MAR-11
        32 10-MAR-11          10-MAR-11

22 rows selected.
SQL>
=> success, all the created archivelog files have been shipped to the secondary database.
We have now a fully working physical standby, that's good but the target is to be able to query against that database, that's not possible in that current state, so next step is to enable the Active Data Guard. To be continued.
Read my next articles :

Nicolas.
 

Friday, March 11, 2011

Upcoming review : Oracle GoldenGate 11g Implementers Guide

I've been asked to review a book published by Pakt, a book about Oracle Golden Gate.

I'm very interested by this tool, especially in a Peoplesoft environment for reporting database within bi-directional replication. I wrote a small note about that few months ago here. But right, I've never took time to go further and try to implement it.
This book is a great opportunity to see all the capacity of Oracle Golden Gate, I hope to read there a couple of topics :
- bi-directional replication
- replicating only a set of tables
- replicating only a set of rows
- upgrading a database with nearly zero downtime
- performance measurment
- licensing (?)
You can already read a sample chapter before going further.

Nicolas.

Thursday, March 03, 2011

PSOVM DB server : Database name case sensitivity

Few days ago, an interesting question has been raised in Peoplesoft OVM forum. After deploying the PSOVM database and PSOVM Apps/batch/PIA, the application server did not start at all. No helpful error message, nothing.
After few research, it appears the database name in PS.PSDBOWNER was in lower case (it must be in CAPITAL letter), how can it be done ?
The only thing I can see is given a database name in lower during the PSOVM database server deployment.
Let’s have a try.
Here, I gave “testdb” as database name :
PSOVMDB_lower_002 
Once the deployment is completed, let’s check the PS.PSDBOWNER table content :
PSOVMDB_lower_003 
Bingo ! The DBNAME is in lower case. Too bad, you don’t get any chance to make the appserver starting (batch neither).
So, basically two solutions :
1. Always give a database name in UPPER case
2. Update that column to make it in capital letter once the deployment is completed (and before starting PSOVM Apps)

That’s not documented and nothing is made to prevent it, but it would be nice to allow us to make a database within a lower case name…
As I noted in this previous blog entry, the Peoplesoft Database Wizard for Oracle DB has the same restriction (at least it is documented and test is made to prevent it), but it would be much nicer to be able to choose the case we want to have.
Automate a simple update in the database is so simple (either in PSOVM deployment and DBWizard), is it not ?

Nicolas.

Tuesday, February 22, 2011

OT: Dell OpenManage (Server Administration)

My main server is a Dell Power Edge PE2900III, CentOS5.5 64-bit based.
A couple of months ago, I installed OpenManage 6.2, a suite of  utilities including Dell Update Package and Server Administration, it was not that a straightforward installation, but using the workaround as suggested here, use “Tikanga” line instead of the standard one coming in /etc/redhat-release file, and it goes smoothly.
The OMSA (for OpenManage Server Administration) is pretty useful to manage the all hardware of the server.

1) My PERC 6i/Integrated firmware has been marked as obsolete (firmware v6.0.2) for a while now, I then decided to install the latest one (firmware v6.3.0 from Dec-2010).
And here start all the pain.
The binary installation of the firmware just failed without more explanations (fortunately enough, it did not installed at all), until I discovered that it requires the latest version of OpenManage to get installed (mine is 6.2, the latest one being 6.4).
Then, why not, let’s go for an OpenManage upgrade.

2) And here a new pain.
The upgrade of OpenManage was not straightforward at all, somehow, the version I got installed was version 6.2 *32*-bit whereas the latest version 6.4 is *64*-bit.
I tried to follow the nice instructions given by Dell for Linux OS, but when doing so, many errors as below are reported :
…
file /usr/share/locale/en/LC_MESSAGES/libsmbios-2.2-x86_64.mo from install of libsmbios-2.2.26-6.2.el5.i386 conflicts with file from package libsmbios-2.2.19-10.1.el5.x86_64
…
Well, I was rather speechless, but one way to go, deinstall everything from the already installed OpenManage. I should be very thankful to Trevor who gave the all proper steps.
I’ve finally get OpenManage upgraded to 6.4, then following the Dell Update Package documentation, can run the upgrade of the PERC 6i firmware as I expected in point 1.

3) At that point, I re-installed OM, but do not have OMSA working anymore (in previous point 2, I have had to de-install everything !), I have had to re-install OMSA as well, downloaded from the Dell download center. And here again, a couple of errors were coming out, complaining about conflict between 64 and 32-bit RPMs. I firstly have to deinstall them using “rpm –e”, and re-install them from the given downloaded installation package (we can find them under linux/REHL/script/RPMS). And finally, get the OMSA 6.4 login page ! Few changes, not sure how far are the changes, but looks nice (find out more in the Dell documentation). And the PERC 6i firmware is up-to-date.

One more proof, if it was needed, upgrade firmware is never, ever a walkover.

OT: QNAP firmware update

About two years ago in 2008, I bought a NAS server, QNAP TS-409 Pro to host all my virtual machines and all the software deposits.
It was working fine, 4 hard disks 1Tb in RAID-5, despite an unfriendly GUI. The webserver was really crazy, non intuitive and non friendly either (as far as I remember, it was firmware version 2.0.1) ! 
Later in Jul-2009, Qnap released a new version of the firmware 3.1.0, finally offering a much better user interface. It always scared me to touch such firmware on a NAS server, anything can goes wrong, crashing and losing for ever your NAS data during flash.
This is one of the reason I’m always waiting for a couple of weeks or months after the new firmware version release to apply it onto my device.
The last firmware version, 3.3.0 (Sept-2010), did not make exception, especially since it does not change that much the GUI (compared to version 3.1.0), but rather a big bug fixes patch.
Applying it was fortunately not painful at all, and rather quick. After a bounce of the server, everything get back working as expected.
The only thing I’ve had to take care is the email alert notification which does not work. I found an old thread in Qnap forum about that issue suggesting the following (add the last two lines in bold):
/etc/config/ssmtp/ssmtp.conf
(…)
FromLineOverride=YES
UseTLS = NO
UseSTARTTLS = NO
Thanks to the community forum and long life to Qnap !

Nicolas.

Monday, February 14, 2011

Oracle VM template - webinar

Still not convinced by the Peoplesoft OVM ? Attend the webinar this week, I think it can be very informative :
Deploying Oracle VM Templates for Oracle E-Business Suite and Oracle PeopleSoft Enterprise Applications

Nicolas.

Install Tuxedo 10gR3 and PT8.51 on OL6.0 : “strings: '/lib/libc.so.6': No such file”

Tuxedo is one of the first component to be installed for a Peoplesoft installation. Let’s have a try within a Tuxedo 10gR3 installation on the brand new OL6.0 server.

[root@orion4 ~]# groupadd psoft
[root@orion4 ~]# useradd -g psoft tuxedo
[root@orion4 ~]# cd /apps/
[root@orion4 apps]# mkdir mdlware
[root@orion4 apps]# chown root:psoft mdlware
[root@orion4 apps]# su - tuxedo
[tuxedo@orion4:/home/tuxedo]$
[tuxedo@orion4:/home/tuxedo]$ cd /nfs/software/PeopleSoftCD/BEA/Tuxedo/Oracle_Tuxedo_10gR3_Linux_64
[tuxedo@orion4:/nfs/software/PeopleSoftCD/BEA/Tuxedo/Oracle_Tuxedo_10gR3_Linux_64]$ ./tuxedo10gR3_64_Linux_01_x86.bin -i console
Preparing to install...
Extracting the JRE from the installer archive...
Unpacking the JRE...
Extracting the installation resources from the installer archive...
Configuring the installer for this system's environment...
strings: '/lib/libc.so.6': No such file

Launching installer.…
Despite that error above, the Tuxedo Install goes successfully till the end.
…
===============================================================================
Installation Complete
---------------------

Congratulations. Tuxedo 10gR3 has been successfully installed to:

   /apps/mdlware/tuxedo10gR3

PRESS <ENTER> TO EXIT THE INSTALLER:
[tuxedo@orion4:/nfs/software/PeopleSoftCD/BEA/Tuxedo/Oracle_Tuxedo_10gR3_Linux_64]$

And now let’s have a try within Peopletools 8.51 installer :
[root@orion4:/root]# useradd -g psoft pt851
[root@orion4:/root]# su - pt851
[pt851@orion4:/home/pt851]$ cd /nfs/software
[pt851@orion4:/nfs/software]$ cd PeopleSoftCD/PeopleTools/PT8.51/PeopleTools8.51.00/
[pt851@orion4:/nfs/software/PeopleSoftCD/PeopleTools/PT8.51/PeopleTools8.51.00]$ ls
Disk1  Disk2  Disk3
[pt851@orion4:/nfs/software/PeopleSoftCD/PeopleTools/PT8.51/PeopleTools8.51.00]$ cd Disk1
[pt851@orion4:/nfs/software/PeopleSoftCD/PeopleTools/PT8.51/PeopleTools8.51.00/Disk1]$ ls
InstData  setup.bat  setup.sh
[pt851@orion4:/nfs/software/PeopleSoftCD/PeopleTools/PT8.51/PeopleTools8.51.00/Disk1]$ ./setup.sh
Setting temporary directory /tmp/IA.2197
Executing setup.linux   -DPS_UMASK=0022
Preparing to install...
Extracting the JRE from the installer archive...
Unpacking the JRE...
Extracting the installation resources from the installer archive...
Configuring the installer for this system's environment...
strings: '/lib/libc.so.6': No such file
…
Same error as Tuxedo Installer. And again, despite that error, everything goes successfully.
…
===============================================================================
Installing...
-------------

[==================|==================|==================|==================]
[------------------|------------------|------------------|------------------]

===============================================================================
Installation Complete
---------------------

Congratulations. PeopleTools has been successfully installed to:

   /apps/psoft/pt851

PRESS <ENTER> TO EXIT THE INSTALLER:
[pt851@orion4:/nfs/software/PeopleSoftCD/PeopleTools/PT8.51/PeopleTools8.51.00/Disk1]$

Looks like the InstallAnywhere tool does not like OL6.0. You can choose to ignore this error (no harm), or create the following symbolic link under /lib before starting the entire install :
[root@orion4:/lib]# ln -s /usr/lib64/libc.so libc.so.6
Once this symbolic link is created, there’s no more any error/warning coming from the installer. I like it better.

In the end, I created and configured a new domain against an existing database (the PSOVM HCM9.1 on Peopletools 8.51.02), and everything works as expected.
-------------------------------
PeopleSoft Domain Boot Menu
-------------------------------
     Domain Name: h91tmplt

  1) Boot (Serial Boot)
  2) Parallel Boot
  q) Quit

Command to execute (1-2, q) [q]: 1

Archived a copy of the domain configuration to /apps/psoft/pt851/appserv/h91tmplt/Archive/psappsrv.cfg
Attempting to boot bulletin board...
tmadmin - Copyright (c) 2007-2008 Oracle.
Portions * Copyright 1986-1997 RSA Data Security, Inc.
All Rights Reserved.
Distributed under license by Oracle.
Tuxedo is a registered trademark.
No bulletin board exists. Entering boot mode.

> INFO: Oracle Tuxedo, Version 10.3.0.0, 64-bit, Patch Level 035

Booting admin processes ...

exec BBL -A :
        process id=9818 ... Started.
1 process started.
Attaching to active bulletin board.

> Attempting to boot ...
INFO: Oracle Tuxedo, Version 10.3.0.0, 64-bit, Patch Level 035

Booting server processes ...

exec PSWATCHSRV -o ./LOGS/stdout -e ./LOGS/stderr -A -- -ID 112980 -D H91TMPLT -S PSWATCHSRV :
        process id=9822 ... Started.
exec PSAPPSRV -o ./LOGS/stdout -e ./LOGS/stderr -s@psappsrv.lst -- -D H91TMPLT -S PSAPPSRV :
        process id=9823 ... Started.
exec PSAPPSRV -o ./LOGS/stdout -e ./LOGS/stderr -s@psappsrv.lst -- -D H91TMPLT -S PSAPPSRV :
        process id=9830 ... Started.
exec PSAPPSRV -o ./LOGS/stdout -e ./LOGS/stderr -s@psappsrv.lst -- -D H91TMPLT -S PSAPPSRV :
        process id=9835 ... Started.
exec PSAPPSRV -o ./LOGS/stdout -e ./LOGS/stderr -s@psappsrv.lst -- -D H91TMPLT -S PSAPPSRV :
        process id=9855 ... Started.
exec PSAPPSRV -o ./LOGS/stdout -e ./LOGS/stderr -s@psappsrv.lst -- -D H91TMPLT -S PSAPPSRV :
        process id=9861 ... Started.
exec PSAPPSRV -o ./LOGS/stdout -e ./LOGS/stderr -s@psappsrv.lst -- -D H91TMPLT -S PSAPPSRV :
        process id=9866 ... Started.
exec PSAPPSRV -o ./LOGS/stdout -e ./LOGS/stderr -s@psappsrv.lst -- -D H91TMPLT -S PSAPPSRV :
        process id=9871 ... Started.
exec PSAPPSRV -o ./LOGS/stdout -e ./LOGS/stderr -s@psappsrv.lst -- -D H91TMPLT -S PSAPPSRV :
        process id=9877 ... Started.
exec PSSAMSRV -o ./LOGS/stdout -e ./LOGS/stderr -A -- -D H91TMPLT -S PSSAMSRV :
        process id=9882 ... Started.
exec PSSAMSRV -o ./LOGS/stdout -e ./LOGS/stderr -A -- -D H91TMPLT -S PSSAMSRV :
        process id=9885 ... Started.
exec PSSAMSRV -o ./LOGS/stdout -e ./LOGS/stderr -A -- -D H91TMPLT -S PSSAMSRV :
        process id=9888 ... Started.
exec PSMONITORSRV -o ./LOGS/stdout -e ./LOGS/stderr -A -- -ID 112980 -D H91TMPLT -S PSMONITORSRV :
        process id=9892 ... Started.
exec JSL -o ./LOGS/stdout -e ./LOGS/stderr -A -- -n //orion4.phoenix.nga:9000 -m 9 -M 12 -I 5 -j ANY -x 40 -S 10 -c 1000000 -w JSH :
        process id=9896 ... Started.
exec JREPSVR -o ./LOGS/stdout -e ./LOGS/stderr -A -- -W -P /apps/psoft/pt851/appserv/h91tmplt/jrepository :
        process id=9906 ... Started.
15 processes started.
…
[pt851@orion4:/apps/psoft/pt851/appserv]$ more /etc/redhat-release
Red Hat Enterprise Linux Server release 6.0 (Santiago)
[pt851@orion4:/apps/psoft/pt851/appserv]$ uname -a
Linux orion4.phoenix.nga 2.6.32-100.28.5.el6.x86_64 #1 SMP Wed Feb 2 18:40:23 EST 2011 x86_64 x86_64 x86_64 GNU/Linux
[pt851@orion4:/apps/psoft/pt851/appserv]$

Well, Peoplesoft is not yet supported on OL6.0, not more than Oracle database (here above I’m using only the client, the database being on a remote server). Awaiting a certification, we can use it for testing purpose only.

Nicolas.

Oracle 11.2.0.2 on OL6.0

It is not certified yet, but I wanted to check it out, just to see how it is behave differently.
Well, nothing special, following the Oracle 11gR2 installation Guide for Oracle Linux 5 is fine, except for one package (pdksh) which was not required on version 5 but was for version 4 (http://download.oracle.com/docs/cd/E11882_01/install.112/e16763/pre_install.htm#CIHDDFAA).

So, I changed the limits values:
[root@orion4 ~]# tail -10 /etc/security/limits.conf
#ftp             hard    nproc           0
#@student        -       maxlogins       4

# End of file
oracle              soft    nproc   2047
oracle              hard    nproc   16384
oracle              soft    nofile  1024
oracle              hard    nofile  65536
oracle              soft    stack   10240
And installed the required RPMs from OL 6.0 DVD :
[root@orion4 Packages]# rpm -Uvh kernel-headers-2.6.32-71.el6.x86_64.rpm
warning: kernel-headers-2.6.32-71.el6.x86_64.rpm: Header V3 RSA/SHA256 Signature, key ID ec551f03: NOKEY
Preparing...                ########################################### [100%]
   1:kernel-headers         ########################################### [100%]
[root@orion4 Packages]# rpm -Uvh glibc-headers-2.12-1.7.el6.x86_64.rpm
warning: glibc-headers-2.12-1.7.el6.x86_64.rpm: Header V3 RSA/SHA256 Signature, key ID ec551f03: NOKEY
Preparing...                ########################################### [100%]
   1:glibc-headers          ########################################### [100%]
[root@orion4 Packages]# rpm -Uvh glibc-devel-2.12-1.7.el6.x86_64.rpm
warning: glibc-devel-2.12-1.7.el6.x86_64.rpm: Header V3 RSA/SHA256 Signature, key ID ec551f03: NOKEY
Preparing...                ########################################### [100%]
   1:glibc-devel            ########################################### [100%]
[root@orion4 Packages]# rpm -Uvh compat-gcc-34-3.4.6-19.el6.x86_64.rpm
warning: compat-gcc-34-3.4.6-19.el6.x86_64.rpm: Header V3 RSA/SHA256 Signature, key ID ec551f03: NOKEY
Preparing...                ########################################### [100%]
   1:compat-gcc-34          ########################################### [100%]
[root@orion4 Packages]# rpm -Uvh libaio-devel-0.3.107-10.el6.x86_64.rpm
warning: libaio-devel-0.3.107-10.el6.x86_64.rpm: Header V3 RSA/SHA256 Signature, key ID ec551f03: NOKEY
Preparing...                ########################################### [100%]
   1:libaio-devel           ########################################### [100%]
[root@orion4 Packages]#
[root@orion4 Packages]# rpm -Uvh compat-libstdc++-33-3.2.3-69.el6.x86_64.rpm
warning: compat-libstdc++-33-3.2.3-69.el6.x86_64.rpm: Header V3 RSA/SHA256 Signature, key ID ec551f03: NOKEY
Preparing...                ########################################### [100%]
   1:compat-libstdc++-33    ########################################### [100%]
[root@orion4 Packages]#
[root@orion4 Packages]# rpm -Uvh elfutils-libelf-devel-0.148-1.el6.x86_64.rpm
warning: elfutils-libelf-devel-0.148-1.el6.x86_64.rpm: Header V3 RSA/SHA256 Signature, key ID ec551f03: NOKEY
Preparing...                ########################################### [100%]
   1:elfutils-libelf-devel  ########################################### [100%]
[root@orion4 Packages]#
[root@orion4 Packages]# rpm -Uvh ppl-0.10.2-11.el6.x86_64.rpm
warning: ppl-0.10.2-11.el6.x86_64.rpm: Header V3 RSA/SHA256 Signature, key ID ec551f03: NOKEY
Preparing...                ########################################### [100%]
   1:ppl                    ########################################### [100%]
[root@orion4 Packages]#  rpm -Uvh cloog-ppl-0.15.7-1.2.el6.x86_64.rpm
warning: cloog-ppl-0.15.7-1.2.el6.x86_64.rpm: Header V3 RSA/SHA256 Signature, key ID ec551f03: NOKEY
Preparing...                ########################################### [100%]
   1:cloog-ppl              ########################################### [100%]
[root@orion4 Packages]#
[root@orion4 Packages]# rpm -Uvh mpfr-2.4.1-6.el6.x86_64.rpm
warning: mpfr-2.4.1-6.el6.x86_64.rpm: Header V3 RSA/SHA256 Signature, key ID ec551f03: NOKEY
Preparing...                ########################################### [100%]
   1:mpfr                   ########################################### [100%]
[root@orion4 Packages]# rpm -Uvh cpp-4.4.4-13.el6.x86_64.rpm
warning: cpp-4.4.4-13.el6.x86_64.rpm: Header V3 RSA/SHA256 Signature, key ID ec551f03: NOKEY
Preparing...                ########################################### [100%]
   1:cpp                    ########################################### [100%]
[root@orion4 Packages]#  rpm -Uvh gcc-4.4.4-13.el6.x86_64.rpm
warning: gcc-4.4.4-13.el6.x86_64.rpm: Header V3 RSA/SHA256 Signature, key ID ec551f03: NOKEY
Preparing...                ########################################### [100%]
   1:gcc                    ########################################### [100%]
[root@orion4 Packages]#
[root@orion4 Packages]# rpm -Uvh libstdc++-devel-4.4.4-13.el6.x86_64.rpm
warning: libstdc++-devel-4.4.4-13.el6.x86_64.rpm: Header V3 RSA/SHA256 Signature, key ID ec551f03: NOKEY
Preparing...                ########################################### [100%]
   1:libstdc++-devel        ########################################### [100%]
[root@orion4 Packages]#  rpm -Uvh gcc-c++-4.4.4-13.el6.x86_64.rpm
warning: gcc-c++-4.4.4-13.el6.x86_64.rpm: Header V3 RSA/SHA256 Signature, key ID ec551f03: NOKEY
Preparing...                ########################################### [100%]
   1:gcc-c++                ########################################### [100%]

Then create group, user and folders :
[root@orion4 ~]# groupadd dba
[root@orion4 ~]# useradd -g dba oracle
[root@orion4 ~]# mkdir /apps
[root@orion4 ~]# chmod a+rwx /apps
[root@orion4 ~]# mkdir /oradata
[root@orion4 ~]# chown oracle:dba /oradata
[root@orion4 ~]# su - oracle
[oracle@orion4 ~]$ pwd
/home/oracle
[oracle@orion4 ~]$ vi .bash_profile
[oracle@orion4 ~]$ more .bash_profile
# .bash_profile

# Get the aliases and functions
if [ -f ~/.bashrc ]; then
        . ~/.bashrc
fi

# User specific environment and startup programs

PATH=$PATH:$HOME/bin

export PATH

export ORACLE_BASE=/apps/oracle
export ORACLE_HOME=$ORACLE_BASE/product/11.2.0.2
export ORACLE_BIN=$ORACLE_HOME/bin
export PATH=$ORACLE_BIN:$PATH
export LD_LIBRARY_PATH=$ORACLE_HOME/lib:$LD_LIBRARY_PATH

[oracle@orion4 ~]$

Then started the installer :

 OEL60_Oracle_002  
OEL60_Oracle_005
 OEL60_Oracle_007                 
I skipped a lot of screenshots, they are the same as my previous installation of 11.2.0.2 on OEL 5.3
The change is here below :
OEL60_Oracle_025 
pdksh is not available on OL6.0 package repository, take it from one of the previous versions.
[root@orion4 Packages]#
--> From OEL4.7 (Disk1) – or
http://public-yum.oracle.com/repo/OracleLinux/OL5/6/base/x86_64/
[root@orion4 RPMS]# pwd
/mnt/cdrom/Enterprise/RPMS
[root@orion4 RPMS]# rpm -Uvh pdksh-5.2.14-30.6.x86_64.rpm
warning: pdksh-5.2.14-30.6.x86_64.rpm: Header V3 DSA/SHA1 Signature, key ID b38a8516: NOKEY
Preparing...                ########################################### [100%]
   1:pdksh                  ########################################### [100%]
[root@orion4 RPMS]#

Then it is continuing without any issue.
…<snipped>…
OEL60_Oracle_029    OEL60_Oracle_033

And eventually, we are able to connect onto the demo database I created during the installation :
[root@orion4 ~]# uname -a
Linux orion4.phoenix.nga 2.6.32-100.28.5.el6.x86_64 #1 SMP Wed Feb 2 18:40:23 EST 2011 x86_64 x86_64 x86_64 GNU/Linux
[root@orion4 ~]# more /etc/redhat-release
Red Hat Enterprise Linux Server release 6.0 (Santiago)
[root@orion4 ~]#
[root@orion4 ~]# su - oracle
[oracle@orion4:/home/oracle]$ lsnrctl status

LSNRCTL for Linux: Version 11.2.0.2.0 - Production on 13-FEB-2011 17:30:03

Copyright (c) 1991, 2010, Oracle.  All rights reserved.

Connecting to (DESCRIPTION=(ADDRESS=(PROTOCOL=IPC)(KEY=EXTPROC1521)))
STATUS of the LISTENER
------------------------
Alias                     LISTENER
Version                   TNSLSNR for Linux: Version 11.2.0.2.0 - Production
Start Date                13-FEB-2011 17:16:22
Uptime                    0 days 0 hr. 13 min. 40 sec
Trace Level               off
Security                  ON: Local OS Authentication
SNMP                      OFF
Listener Parameter File   /apps/oracle/product/11.2.0.2/network/admin/listener.ora
Listener Log File         /apps/oracle/diag/tnslsnr/orion4/listener/alert/log.xml
Listening Endpoints Summary...
  (DESCRIPTION=(ADDRESS=(PROTOCOL=ipc)(KEY=EXTPROC1521)))
  (DESCRIPTION=(ADDRESS=(PROTOCOL=tcp)(HOST=orion4.phoenix.nga)(PORT=1521)))
Services Summary...
Service "demo112" has 1 instance(s).
  Instance "demo112", status READY, has 1 handler(s) for this service...
Service "demo112XDB" has 1 instance(s).
  Instance "demo112", status READY, has 1 handler(s) for this service...
The command completed successfully
[oracle@orion4:/home/oracle]$ export ORACLE_SID=demo112
[oracle@orion4:/home/oracle]$ sqlplus scott/demo112

SQL*Plus: Release 11.2.0.2.0 Production on Sun Feb 13 17:30:16 2011

Copyright (c) 1982, 2010, Oracle.  All rights reserved.

ERROR:
ORA-28000: the account is locked

Enter user-name: ^C
[oracle@orion4:/home/oracle]$ sqlplus / as sysdba

SQL*Plus: Release 11.2.0.2.0 Production on Sun Feb 13 17:30:25 2011

Copyright (c) 1982, 2010, Oracle.  All rights reserved.

Connected to:
Oracle Database 11g Enterprise Edition Release 11.2.0.2.0 - 64bit Production
With the Partitioning, OLAP, Data Mining and Real Application Testing options

SQL> alter user scott account unlock;

User altered.

SQL> conn scott/tiger
ERROR:
ORA-28001: the password has expired

Changing password for scott
New password:
Retype new password:
Password changed
Connected.
SQL> desc emp
Name                                      Null?    Type
----------------------------------------- -------- ----------------------------
EMPNO                                     NOT NULL NUMBER(4)
ENAME                                              VARCHAR2(10)
JOB                                                VARCHAR2(9)
MGR                                                NUMBER(4)
HIREDATE                                           DATE
SAL                                                NUMBER(7,2)
COMM                                               NUMBER(7,2)
DEPTNO                                             NUMBER(2)

SQL> select * from v$version;

BANNER
--------------------------------------------------------------------------------
Oracle Database 11g Enterprise Edition Release 11.2.0.2.0 - 64bit Production
PL/SQL Release 11.2.0.2.0 - Production
CORE    11.2.0.2.0      Production
TNS for Linux: Version 11.2.0.2.0 - Production
NLSRTL Version 11.2.0.2.0 - Production

SQL>

Enjoy it !